
Quando se trata de fazer seleções no Photoshop, existem realmente dois tipos de pessoas: quem sabe usar a Pen Tool e quem luta. A maioria das pessoas adia aprender a usar a Ferramenta Caneta pelo maior tempo possível, enquanto outras nunca aprendem, acreditando que é muito confuso, muito complicado e simplesmente antinatural.
Por fim, o trabalho deles no Photoshop é prejudicado, pois eles confiam na Lasso Tool para praticamente tudo o que não podem selecionar com as Rectangular ou Elliptical Marquee Tools. Neste tutorial do Adobe Photoshop, colocaremos um fim ao sofrimento. Vamos aprender o quão fácil é realmente fazer seleções com a Pen Tool.
Agora, quando digo "fácil", não quero dizer que você vai ler este tutorial e ser instantaneamente transformado em um Pen Master. Aprender a usar a Pen Tool é como aprender a andar de bicicleta. Depois de aprender, parecerá completamente natural e você se perguntará como alguém poderia não saber como usar algo tão simples. Mas chegar a esse ponto requer um pouco de prática e esforço, e ao ler todos os livros sobre como andar de bicicleta, você pode ensinar os fundamentos de como os pedais, marchas e freios funcionam, não é até você estar na bicicleta lutando para manter o equilíbrio de que o verdadeiro aprendizado começa.
Uma das melhores coisas da Pen Tool é que não é algo exclusivo do Photoshop. Longe disso! Praticamente todos os programas populares de edição de fotos, gráficos e layout de página usam a Ferramenta Caneta de uma forma ou de outra. Assim, depois de aprender a usá-lo no Photoshop, você já terá um bom entendimento de como usá-lo em muitos outros programas também!
Onde encontro a ferramenta Caneta?
Antes de começarmos a falar sobre o que é a Pen Tool ou como usá-la, devemos procurar primeiro onde encontrá-la no Photoshop. Você encontrará a Ferramenta Caneta na paleta Ferramentas, agrupada com as Ferramentas de forma, a Ferramenta de texto e as Ferramentas de seleção de caminho (seta branca) e Seleção direta (seta preta) (veja a imagem à esquerda).
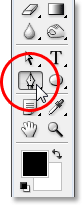
Ferramenta Caneta do Photoshop
Obviamente, isso pode levantar a questão de por que, se podemos fazer seleções com a Pen Tool, ela não está agrupada com as outras ferramentas de seleção (a Rectangular Marquee Tool, a Elliptical Marquee Tool, a Eliptical Marquee Tool, a Lasso Tool etc.) em a parte superior da paleta Ferramentas? Por que está lá embaixo com outras ferramentas que claramente não são ferramentas de seleção?
Essa é uma excelente pergunta e, por acaso, existe uma resposta igualmente excelente, a qual abordaremos em um momento.
Por que é chamada a ferramenta "Caneta"?
Um dos primeiros obstáculos para aprender a usar a Pen Tool, como em muitas outras coisas no Photoshop, é o nome, pois, afinal, se existe uma coisa que todo mundo que já tentou usá-la sabe, essa coisa não é uma caneta. Pelo menos, não é o tipo de caneta que você normalmente pensaria quando ouvir a palavra "caneta". Tente escrever seu nome com ele da mesma forma que você pode assinar em um pedaço de papel com uma caneta e você provavelmente terminará com uma bagunça distorcida e emaranhada e coisas se entrelaçando (é claro, suponho que pode muito bem ser como você assina seu nome).
 Pierre Bezier
Portanto, se não funciona como uma caneta de tinta tradicional, por que é chamada de Ferramenta de Caneta? A Pen Tool foi chamada de várias coisas ao longo dos anos e, com isso, não quero dizer o tipo de coisa que você pode ter chamado em momentos de frustração. Você pode ter ouvido falar sobre a Bezier Pen ou a Bezier Tool, e foi porque foi criada por um homem chamado Pierre Bezier (que é ele à esquerda), um engenheiro francês e um cara inteligente que inventou o matemática sofisticada que alimenta a ferramenta enquanto trabalha na empresa automobilística Renault (a Pen Tool foi criada originalmente para ajudar a projetar carros).
Você também pode ter ouvido a Pen Tool referida como Paths Tool, e esse é realmente o nome mais apropriado para ela. A Ferramenta Caneta tem tudo a ver com desenhar "caminhos". Para fazer seleções com a Caneta, simplesmente convertemos o caminho ou os caminhos que desenhamos em seleções. Porém, sempre começa com um caminho.
Códigos de acesso, ações e plug-in de filtros: Erro no código de acesso (ads-basics-middle-2)
O que é um caminho?
Um "caminho" é, honestamente, algo que pode parecer um pouco fora de lugar dentro de um programa como o Photoshop. O motivo é porque o Photoshop é principalmente um programa baseado em pixels . São necessários milhões de pequenos pixels quadrados que compõem uma imagem digital típica e fazem coisas com eles. Os caminhos, por outro lado, não têm absolutamente nada a ver com pixels, razão pela qual eu disse que eles podem parecer fora de lugar em um programa usado principalmente para editar e desenhar pixels.
Um caminho nada mais é do que uma linha que vai de um ponto a outro, uma linha que é completamente independente e não se importa com os pixels abaixo dele. A linha pode ser reta ou curva, mas sempre vai de um ponto a outro, e, como mencionei, não tem nada a ver com os pixels da imagem. Um caminho é completamente separado da própria imagem. De fato, um caminho é tão separado que, se você tentasse imprimir sua imagem com um caminho visível na tela, o caminho não apareceria no papel. Além disso, se você salvou sua imagem como um arquivo JPEG.webp e a carregou em um site, mesmo se salvou a imagem com o caminho visível na tela no Photoshop, não a verá na imagem no site. Os caminhos são apenas para os olhos e para o Photoshop. Ninguém mais os verá, a menos que eles passem pelo seu computador enquanto você estiver trabalhando.
Sempre precisamos de no mínimo dois pontos para criar um caminho, pois precisamos saber onde o caminho começa e onde termina. Se usarmos pontos suficientes para trazer o caminho de volta ao mesmo ponto em que ele começou, podemos criar formas diferentes a partir dos caminhos, que é exatamente como as várias Ferramentas de forma do Photoshop funcionam. A Ferramenta Retângulo usa caminhos, conectados por pontos, para desenhar uma forma retangular. A Ellipse Tool usa caminhos, conectados por pontos, para desenhar uma forma elíptica e assim por diante. É também como a Ferramenta de texto do Photoshop funciona, embora o Photoshop lide com um tipo um pouco diferente do que com formas regulares, mas todo tipo de Photoshop é essencialmente feito de caminhos. De fato, você pode converter texto em formas, o que oferece as mesmas opções de edição de caminhos com o tipo obtido ao trabalhar com formas.
Você também pode ter ouvido caminhos referidos como contornos, e essa é uma descrição muito boa do que é um caminho ou, pelo menos, do que pode ser. Podemos desenhar um caminho quadrado e, se não fizermos mais nada, como não o preenchermos com uma cor ou aplicarmos um traçado a ele, tudo o que temos é um esboço básico de um quadrado. Mesmo com um círculo ou qualquer outra forma que desenhamos. O caminho em si é apenas o contorno da forma. Não é até fazermos algo com o caminho, como preenchê-lo, aplicar um traçado ou convertê-lo em uma seleção, que o caminho realmente se torna algo mais do que um esboço básico.
Você pode selecionar um caminho inteiro usando a Ferramenta de seleção de caminho (também conhecida como ferramenta "seta preta") ou selecionar pontos ou segmentos de caminho individuais usando a Ferramenta de seleção direta (a ferramenta "seta branca"). Um caminho "segmento", ou "segmento de linha", como às vezes é chamado, é qualquer caminho entre dois pontos. Um caminho retangular, por exemplo, seria composto de quatro pontos (um em cada canto), e os caminhos individuais que conectam os pontos ao longo da parte superior, inferior, esquerda e direita para criar a forma do retângulo são os segmentos do caminho . O caminho real em si é a combinação de todos os segmentos de caminho individuais que compõem a forma.
Isso pode ser um pouco confuso, então vamos ver o que quero dizer. Abra um novo documento dentro do Photoshop. Não importa qual o tamanho. Vou escolher o tamanho de 640 x 480 da lista de predefinições, mas como eu disse, não importa qual o tamanho que você escolher. Selecione sua Ferramenta de Caneta na paleta Ferramentas. Você também pode selecionar a Ferramenta Caneta simplesmente pressionando a letra P no teclado.
Os dois modos da ferramenta Caneta
Agora, antes de continuarmos, precisamos primeiro nos certificar de que estamos trabalhando com caminhos, e isso ocorre porque a Pen Tool realmente tem dois modos diferentes nos quais pode trabalhar e, por padrão, usa o outro. Com a ferramenta Caneta selecionada, se procurarmos na barra de opções na parte superior da tela, veremos um grupo de três ícones:

A Barra de opções do Photoshop mostra o grupo de três ícones que representam cada um dos três modos da Ferramenta de caneta.
Sei que disse que existem dois modos nos quais a Pen Tool pode funcionar e, no entanto, como para tornar as coisas mais confusas, existem três ícones, mas o ícone à direita, que é o ícone Preencher pixels, fica acinzentado e não está disponível ao trabalhar com a ferramenta Caneta. Ele só está disponível ao trabalhar com as várias Ferramentas de forma, portanto, existem apenas dois ícones que precisamos examinar.
O ícone à esquerda é o ícone Camadas de forma, também conhecido como "não aquele que queremos", e é o selecionado por padrão. Se trabalhávamos com a ferramenta Caneta com esse ícone selecionado, estaríamos desenhando formas, como se estivéssemos usando qualquer uma das várias ferramentas de forma, exceto que, em vez de desenhar uma forma predefinida como um retângulo ou uma elipse, poderia desenhar qualquer forma que quiséssemos. Como eu disse, porém, não é isso que queremos. Queremos o ícone ao lado dele, o ícone Caminhos, então vá em frente e clique nele para selecioná-lo:

Tutoriais do Photoshop: Clique no ícone "Caminhos" na Barra de opções para trabalhar com caminhos com a Ferramenta Caneta.
Com a Ferramenta Caneta selecionada e o ícone Caminhos selecionado na Barra de opções, clique uma vez em qualquer lugar do documento. Não clique e arraste, apenas clique. Ao fazê-lo, você adicionará um pequeno ponto quadrado. Eu a ampliei aqui:

Clique uma vez dentro do documento com a Ferramenta Caneta para adicionar um ponto.
Este primeiro ponto que acabamos de adicionar é o ponto de partida do nosso caminho. Agora, no momento, não temos realmente um caminho. Tudo o que temos é um ponto de partida. O "ponto" é tecnicamente chamado de âncora ou ponto de ancoragem e é chamado assim porque ancora o caminho no lugar. Este primeiro ponto irá ancorar o início do caminho para este ponto dentro do documento. À medida que adicionamos mais pontos, cada um deles ancorará o caminho no local naquele local.
Vamos adicionar outro ponto. Clique em outro lugar dentro do documento. Em qualquer lugar serve. Vou clicar em algum lugar à direita do meu ponto inicial:

Tutoriais do Photoshop: adicione um segundo ponto de ancoragem clicando em outro lugar dentro do documento.
Agora adicionei um segundo ponto de ancoragem e veja o que aconteceu. Agora tenho uma linha reta unindo os dois pontos! Essa linha reta é o meu caminho. Como mencionei anteriormente, precisamos de um mínimo de dois pontos para criar um caminho, pois precisamos saber onde o caminho começa e onde termina e agora que temos um ponto inicial e um ponto final, o Photoshop conseguiu conectar o caminho. dois pontos juntos, criando o nosso caminho.
Vamos adicionar mais alguns pontos apenas por diversão. Clique mais algumas vezes em locais diferentes dentro do documento. Novamente, não clique e arraste, basta clicar em:
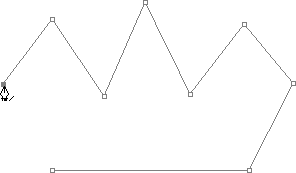
Adicione pontos adicionais clicando em pontos diferentes dentro do documento.
Na imagem acima, adicionei mais sete pontos de ancoragem clicando em pontos diferentes com a Pen Tool, e cada vez que adicionava um, o comprimento do meu caminho aumentava porque um novo "segmento" do caminho foi adicionado entre o ponto anterior e o novo ponto. Meu caminho agora consiste em nove pontos de ancoragem e oito segmentos de caminho. Eu poderia continuar clicando dentro do documento para adicionar mais pontos de ancoragem e segmentos de caminho, mas o que eu realmente gostaria de fazer agora é fechar meu caminho para que ele forme uma forma completa.
Fechando um caminho
Para fechar um caminho, tudo o que precisamos fazer é clicar novamente em nosso ponto de partida inicial. Ao passar o cursor do mouse sobre o ponto inicial, você verá um pequeno círculo no canto inferior direito do ícone da caneta:

Um pequeno círculo aparece no canto inferior direito do ícone da caneta ao passar o cursor sobre o ponto inicial inicial do caminho.
Esse círculo nos diz que estamos prestes a entrar em "círculo completo" com o nosso caminho, terminando onde ele começou. Para fechá-lo, basta clicar diretamente no ponto de partida.
Podemos ver abaixo que meu caminho se tornou um caminho fechado e agora é um esboço básico de uma forma:
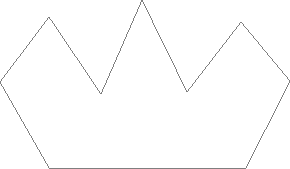
O caminho agora está fechado, terminando no ponto de partida, criando um caminho fechado.
Embora esse caminho tenha sido desenhado apenas por diversão, como um exemplo de como desenhar um caminho básico com a Ferramenta Caneta, posso facilmente transformá-lo em uma seleção. Para isso, precisamos da paleta Paths do Photoshop e veremos a seguir.
Transformando um caminho em uma seleção
Até agora, vimos o que é um caminho e como desenhar um caminho básico com a Pen Tool do Photoshop. Mas como você faz uma seleção do caminho?
Fácil! Existem algumas maneiras de transformar um caminho em uma seleção, incluindo um atalho de teclado útil, mas antes de analisarmos o caminho rápido, vamos analisar o caminho oficial. A "maneira oficial" envolve o uso da paleta Paths do Photoshop, que você encontrará agrupada nas paletas Layers e Channels:
Paleta de caminhos do Photoshop.
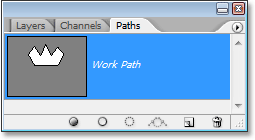
À primeira vista, a paleta Paths é muito semelhante à paleta Layers do Photoshop, e a Adobe propositadamente fez assim, para que você se sinta mais confortável em usá-lo. Podemos ver uma visualização em miniatura da forma do caminho que acabamos de criar e, por padrão, o Photoshop nomeia o caminho "Caminho de trabalho", que é basicamente uma maneira elegante de dizer "temporário", como se você fosse criar um diferente caminho agora sem renomear esse caminho para outra coisa primeiro, este seria substituído pelo novo caminho. Você pode ter apenas um "caminho de trabalho"; portanto, se quiser mantê-lo, clique duas vezes no nome dele na paleta Caminhos e nomeie outra coisa antes de criar um novo caminho.
Como meu caminho se parece um pouco com uma coroa, clicarei duas vezes no nome "Caminho de trabalho", que abre a caixa de diálogo Salvar caminho do Photoshop e vou renomear meu caminho "Coroa":

Você pode salvar um "Caminho de Trabalho" temporário simplesmente renomeando-o.
Clicarei em OK quando terminar e, agora, se eu olhar novamente na paleta Paths, posso ver com certeza que meu "Work Path" foi renomeado "Crown":
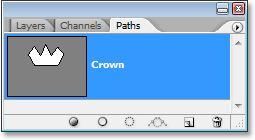
A paleta Caminhos mostrando que o caminho foi renomeado como "Coroa".
Ao renomeá-lo, o caminho agora está salvo e não desaparecerá se eu for criar um novo caminho. Além disso, todos os caminhos salvos são salvos com o documento do Photoshop; portanto, agora, se eu salvar o documento, o caminho será salvo e, na próxima vez que abrir o documento, o caminho ainda estará lá na paleta Caminhos.
Salvar um caminho não é algo que você precisa fazer para transformá-lo em uma seleção. Na maioria dos casos, ao usar a Ferramenta Caneta para fazer seleções, você não precisará do caminho depois de fazer uma seleção, portanto não será necessário salvá-lo. Se você quiser salvá-lo, renomeie-o para algo diferente de "Caminho de Trabalho" e ele será salvo.
Para transformar o caminho em uma seleção, se olharmos para a parte inferior da paleta Caminhos, podemos ver vários ícones. Esses ícones nos permitem fazer coisas diferentes com o nosso caminho. O primeiro ícone à esquerda é o ícone Preencher o caminho com a cor do primeiro plano e, como o nome indica, clicar nele preencherá o caminho com a cor atual do primeiro plano. Interessante, mas não é isso que queremos. O segundo ícone da esquerda é o ícone Traçado do traçado com pincel, que aplicará um traçado ao caminho usando o pincel selecionado atualmente.
Essa é uma ótima maneira de criar efeitos interessantes no Photoshop, mas, pelo que estamos fazendo aqui, transformar um caminho em uma seleção, também não é o que queremos. O que queremos é o terceiro ícone da esquerda, o caminho Carregar como ícone de seleção:
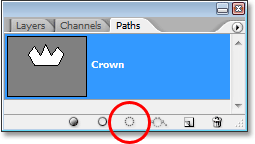
O ícone "Carregar caminho como uma seleção" na parte inferior da paleta Caminhos.
Assim que clico neste ícone, meu caminho dentro do documento se torna uma seleção, como se eu o tivesse criado usando qualquer uma das ferramentas de seleção mais comuns do Photoshop:
O caminho agora foi convertido em uma seleção.
É tão fácil! Na verdade, é ainda mais fácil do que isso, porque existe um atalho de teclado para transformar um caminho em uma seleção sem precisar alternar para a paleta Caminhos. Quando você tiver traçado seu caminho e estiver pronto para transformá-lo em uma seleção, basta pressionar Ctrl + Enter (Win) / Command + Return (Mac) para que o Photoshop converta o caminho em uma seleção.
Até agora, pode ser um pouco mais óbvio para você por que, embora a Pen Tool seja uma ferramenta de seleção, ela não está agrupada com as outras ferramentas de seleção na parte superior da paleta Tools. O motivo é que a Pen Tool é principalmente uma ferramenta de caminho. Ele cria seleções criando primeiro caminhos e, por esse motivo, tem mais em comum com as várias Ferramentas de forma e a Ferramenta de texto, que usam caminhos, do que com as ferramentas básicas de seleção, como a Rectangular Marquee Tool ou o Lasso Ferramenta, que faz seleções baseadas apenas em pixels.
Vejamos um exemplo prático do que aprendemos até agora. Aqui temos uma foto de uma placa de pare em frente a alguns penhascos rochosos:

Uma foto de um sinal de stop.
Digamos que eu quisesse selecionar esse sinal de parada para copiá-lo em sua própria camada. O sinal de parada é composto de nada mais do que uma série de linhas retas, o que tornará isso extremamente fácil. Primeiro, preciso de um ponto de partida para o meu caminho; portanto, começarei no canto superior esquerdo do sinal clicando uma vez para colocar um ponto de ancoragem inicial. Nesse caso, não importa onde eu inicio o caminho, mas vou começar no canto superior esquerdo:
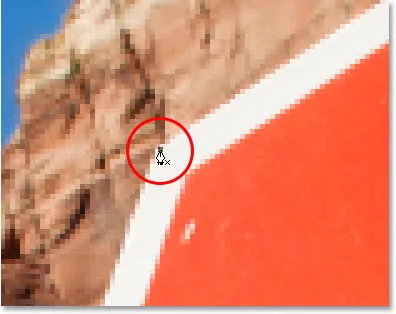
Clique uma vez no canto superior esquerdo do sinal de parada para iniciar o caminho com um ponto de ancoragem inicial.
Observe como sou ampliada aqui enquanto clico. Você encontrará mais fácil ao fazer seleções com a Ferramenta Caneta para ampliar um pouco a sua imagem. Dessa forma, você pode ter certeza de que está mantendo seu caminho dentro da área que deseja selecionar.
No momento, não tenho um caminho, apenas um ponto de partida para o meu caminho. Para criar o caminho, tudo o que preciso fazer é contornar a placa, adicionando um ponto de ancoragem em cada canto onde o caminho precisa mudar de direção. À medida que adiciono cada ponto de ancoragem, um novo segmento de caminho aparecerá unindo o ponto de ancoragem anterior ao novo, até que eu tenha percorrido todo o caminho do sinal. Para fechar o caminho, clicarei novamente no ponto de partida inicial. É um pouco difícil de ver na captura de tela abaixo, mas agora tenho um caminho em torno de todo o sinal de parada, incluindo a postagem à qual está anexado, simplesmente clicando nos cantos em que o caminho precisa mudar de direção:

Um caminho agora aparece ao redor do sinal de parada na imagem.
Se eu olhar agora na paleta Paths, posso ver claramente que tenho um caminho na forma do sinal de parada:
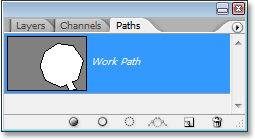
Paleta Caminhos do Photoshop, mostrando o caminho desenhado ao redor do sinal de parada.
Observe como o Photoshop nomeou o caminho "Caminho de trabalho", o que significa que esse caminho é temporário e eu o perco se eu criar um caminho diferente sem salvar esse primeiro, renomeando-o. Mesmo se eu não criar um novo caminho, ainda o perderei quando fechar o documento, a menos que eu o salve primeiro. Não tenho necessidade de salvar esse caminho, portanto, não vou me preocupar com isso. Na maioria dos casos, você também não precisará se preocupar com isso.
Para converter meu caminho em uma seleção, clicarei no caminho Carregar como um ícone de seleção na parte inferior da paleta Camadas ou, com a mesma facilidade, pressione Ctrl + Enter (Win) / Command + Return (Mac):
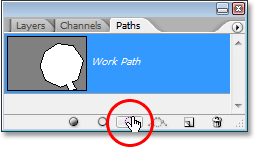
Clique no ícone "Carregar caminho como uma seleção" na paleta Caminhos ou pressione "Ctrl + Enter" (Win) / "Command + Delete" (Mac) para converter o caminho em uma seleção.
Assim que eu faço, meu caminho é convertido em uma seleção e o sinal de parada agora está selecionado:

O sinal de parada agora está selecionado após a conversão do caminho em uma seleção.
Voltarei à paleta Camadas e, para copiar o sinal de parada em sua própria camada, usarei o atalho de teclado Ctrl + J (Win) / Command + J (Mac), que coloca o sinal por conta própria camada acima da camada Plano de fundo:
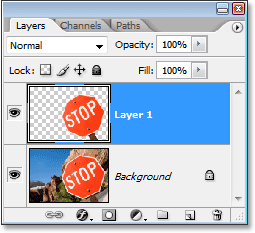
O sinal de parada agora foi copiado em sua própria camada separada.
Com o sinal agora em sua própria camada, eu posso fazer o que quiser com ele, trocar o plano de fundo por uma imagem diferente ou tornar o plano de fundo preto e branco enquanto deixo o sinal colorido, o que eu puder pensar. O ponto é que eu pude selecionar facilmente o sinal clicando nos cantos com a Pen Tool, que criou um caminho ao redor do sinal, e então simplesmente converti o caminho em uma seleção.
Até agora, em nosso olhar para fazer seleções com a Pen Tool no Photoshop, aprendemos que a Pen é uma ferramenta de seleção como as ferramentas de seleção mais comuns do Photoshop, como a Rectangular Marquee e as Lasso Tools, mas que, em vez de fazer seleções com base em pixels, como essas outras ferramentas, a Ferramenta Caneta desenha caminhos que podem ser facilmente convertidos em seleções, na paleta Caminhos ou usando o atalho rápido do teclado.
É por isso que a Caneta não é encontrada na parte superior da paleta Ferramentas com essas outras ferramentas de seleção baseadas em pixels, mas agrupada com as ferramentas de caminho, como as várias Ferramentas de forma, a Ferramenta de texto e as Ferramentas de seleção de caminho e Seleção direta . A Ferramenta Caneta é sobre caminhos, não pixels.
Aprendemos que podemos adicionar pontos de ancoragem dentro do documento, que ancoram o caminho no local, basta clicar em pontos diferentes com a Ferramenta Caneta e, à medida que adicionamos mais e mais pontos de ancoragem, criamos um caminho a cada novo ponto está conectado ao ponto anterior por um novo segmento de caminho. Também aprendemos que um caminho é o que normalmente é chamado de "elemento não imprimível", o que significa que, independentemente de quantos caminhos adicionarmos, nenhum deles estará visível no papel quando imprimirmos a imagem . Eles também não estarão visíveis se exibirmos a imagem em um site. Os caminhos são visíveis apenas para nós quando trabalhamos no Photoshop (embora outros programas como o Adobe Illustrator também suportem caminhos). Não é até fazermos algo com o caminho, como preenchê-lo com uma cor, aplicar um traçado ou convertê-lo em uma seleção, que o caminho se torna algo mais do que apenas um contorno básico e não imprimível de uma forma.
Vimos como seria fácil usar a Ferramenta Caneta para selecionar algo como um sinal de parada, descrevendo-o com um caminho composto por uma série de segmentos de caminho reto e depois transformando o caminho em uma seleção. Isso é ótimo, mas, na verdade, ainda não fizemos nada que não poderíamos ter feito mais facilmente com algo como a Lasso Tool, ou melhor ainda, a Polygonal Lasso Tool, que foi construída especificamente para selecionar formas planas como nossa parada placa. As chances são de que, a menos que você tenha algum fascínio estranho por sinais de trânsito, mais cedo ou mais tarde você desejará selecionar algo um pouco mais interessante e, por "interessante", quero dizer mais desafiador. E por "desafiador", quero dizer algo que contém curvas. A seleção de um objeto curvo no Photoshop geralmente ocorre quando você perde todo o respeito pelas ferramentas básicas de seleção. Felizmente, também é o momento em que a Ferramenta de Caneta realmente brilha!
Antes de continuarmos, devo salientar que tudo o que fizemos até esse momento foi bastante simples. Clique aqui, clique lá, converta o caminho em uma seleção, concluída. A próxima parte em que começamos a desenhar curvas não é tão simples, embora certamente não seja difícil, mas se esta é sua primeira vez com a Pen Tool ou se você não tem muita experiência com ela, trabalhar com curvas pode parecer um pouco natural e até um pouco esmagadora. É definitivamente aí que entra a analogia "andar de bicicleta". Você pode cair algumas vezes no começo e se perguntar como alguém consegue fazê-lo, mas quanto mais você pratica e quanto mais se apega a ela, mais sentido tudo isso. começa a fazer. Em pouco tempo, parecerá uma segunda natureza para você e você entenderá subitamente por que tantas pessoas juram que a Pen Tool é a melhor ferramenta de seleção em todo o Photoshop! Sério, é mesmo.
Obtendo uma alça nas alças de direção
Vamos começar de novo com a ferramenta Caneta. Abra um novo documento em branco do Photoshop ou exclua o que você fez até agora no documento existente, para começarmos do zero. Em seguida, com a ferramenta Caneta selecionada e a opção Caminhos selecionada na Barra de opções (lembre-se de usar a opção Camadas de forma, para que você tenha a opção Caminhos selecionada), clique uma vez em qualquer lugar do documento, assim como nós fizemos antes. Dessa vez, em vez de apenas clicar para adicionar um ponto de ancoragem, clique e arraste o mouse a uma curta distância do ponto de ancoragem antes de soltar o botão do mouse:
Clique em qualquer lugar dentro do documento com a Ferramenta Caneta e arraste a uma curta distância do ponto de ancoragem.
Quando terminar, você verá um ponto de ancoragem com duas linhas saindo dele. À primeira vista, você pode pensar que de alguma forma conseguimos arrastar um caminho com a Pen Tool. Afinal, parece que temos três pontos de ancoragem, um em cada extremidade e outro no meio, com dois segmentos de caminho conectando-os. Se olharmos um pouco mais de perto, podemos ver que os pontos de cada extremidade são um pouco menores que os do meio e que na verdade têm uma forma diferente. O do meio é quadrado e, como vimos, um ponto de ancoragem é quadrado, mas os de ambos os lados parecem em forma de diamante. Alguns pontos de ancoragem são quadrados e outros em forma de diamante?
Não. Todos os pontos de ancoragem são quadrados e têm o mesmo tamanho, o que significa que os pontos menores em forma de diamante nas extremidades não são pontos de ancoragem. E se eles não são pontos de ancoragem, isso significa que as linhas não são segmentos de caminho, pois precisamos de pelo menos dois pontos de ancoragem para criar um caminho e, no momento, o único ponto de ancoragem que temos é o meio. Então, o que exatamente são essas linhas que estão se estendendo para fora do ponto de ancoragem? Eles são alças de direção!
"Ah, alças de direção!" você diz. "Agora eu entendi!"
… … …………….
"Espere, não, não sei. O que diabos são alças de direção?"
Alças de direção são, bem, alças e são usadas apenas ao criar segmentos de caminho curvo. Não há necessidade de alças de direção ao criar segmentos de caminho reto. Geralmente existem dois deles, embora às vezes exista apenas um, e como já vimos, eles se estendem a partir de pontos de ancoragem. Eles são chamados de "alças" porque, como veremos a seguir, você pode agarrá-los e movê-los.
As alças de direção controlam duas coisas. Eles controlam o ângulo da curva, e controlam o comprimento da curva, e fazem isso de uma maneira realmente elegante. Geralmente, há dois deles porque um deles controla o ângulo e o comprimento da curva que entra no ponto de ancoragem e o outro controla o ângulo e o comprimento da curva que sai do ponto de ancoragem.
Antes de vermos como desenhar curvas com as alças de direção, vamos primeiro ver como controlar as alças, pois nosso sucesso com as curvas de desenho dependerá muito da nossa capacidade de controlar as alças. Não se preocupe, não é, como se costuma dizer, ciência dos foguetes. Há apenas algumas coisas simples que você precisa aprender. Já vimos como criar alças de direção, clicando com a Ferramenta Caneta e arrastando para longe do ponto de ancoragem. Quanto mais distantes do ponto de ancoragem arrastamos, mais longas serão as alças de direção. Quanto maior a alça, maior a curva. Cabo curto, curva curta. Cabo longo, curva longa.
Uma das coisas legais que você aprenderá rapidamente sobre a Pen Tool é que ela é extremamente perdoadora. Não há motivo para se preocupar em acertar as coisas da primeira vez ao traçar caminhos, porque podemos voltar e consertar as coisas facilmente quando terminarmos! Você colocou um ponto de ancoragem no lugar errado? Sem problemas! Apenas mova-o para onde você precisar! Vamos ver como fazer isso em um momento. Você arrastou uma alça de direção na direção errada? Não é um problema. Pegue a alça e gire-a na direção que você precisa. Mais uma vez, veremos como fazer isso. Uma de suas direções é muito longa ou muito curta? Sem problema algum. Basta clicar nele e arrastá-lo por mais tempo ou menos, conforme necessário (sim, vamos ver como fazer isso também). Os caminhos são totalmente editáveis o tempo todo, portanto, não há absolutamente nenhuma razão para se preocupar em cometer um erro ou corrigi-lo da primeira vez. Isso não faz você se sentir um pouco melhor já?
Alças de direção de giro e redimensionamento
Como mencionei, eles são chamados de "alças" de direção, porque você pode agarrá-las como alças e movê-las. Vamos ver como fazer isso. Primeiro, veremos como girar as duas alças ao mesmo tempo. Usando o ponto de ancoragem e as duas alças de direção que já criamos, mantenha pressionada a tecla Ctrl (Win) / Command (Mac). Você verá o ícone da Ferramenta de Caneta se transformar temporariamente no ícone Ferramenta de Seleção Direta (seta branca), e porque com a Ferramenta de Caneta selecionada, pressionar "Ctrl / Command" se torna um atalho rápido para acessar temporariamente a Ferramenta de Seleção Direta, que é o que usamos para selecionar diferentes partes do nosso caminho. Em seguida, basta clicar diretamente na pequena forma de diamante no final de qualquer uma das alças de direção (clicar na "linha" em si não funcionará, portanto, você sempre precisará clicar na forma de diamante no final de uma alça para fazer qualquer coisa com ele) e arraste-o ao redor do ponto de ancoragem para girá-lo. Quando você gira uma das alças, a outra alça gira na direção oposta, como uma gangorra. Você também pode perceber que, assim que começar a arrastar a alça, o ícone do cursor do mouse mudará novamente, desta vez para o ícone da Ferramenta Mover, pois estamos movendo algo de um ponto para outro:
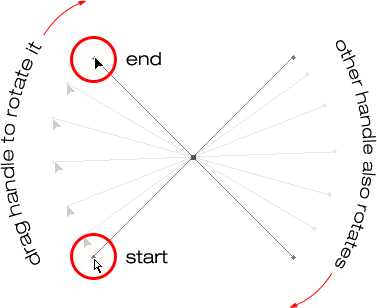
Segure "Ctrl" (Win) / "Command" (Mac) e clique no final de qualquer uma das alças de direção e arraste a alça para girá-la em torno do ponto de ancoragem. À medida que você arrasta uma alça, a outra gira na direção oposta.
Você pode soltar a tecla "Ctrl / Command" assim que começar a arrastar a alça. Não há necessidade de mantê-lo pressionado o tempo todo.
Para redimensionar uma alça de direção enquanto você a gira, basta arrastar a extremidade da alça na direção do ponto de ancoragem para diminuí-la ou arrastá-la para longe do ponto de ancoragem para aumentá-la. Como mencionei acima, uma alça mais curta tornará a curva mais curta e uma alça mais longa tornará a curva mais longa. Você não pode redimensionar as duas alças ao mesmo tempo; portanto, se precisar redimensionar as duas, será necessário arrastar cada uma por mais tempo ou mais separadamente. A única coisa que você pode fazer para os dois ao mesmo tempo é girá-los. Se você já soltou o botão do mouse após girar as alças e o cursor voltou ao ícone Pen Tool e precisar redimensionar uma das alças, mantenha pressionada a tecla "Ctrl / Command" novamente para temporariamente volte para a Direct Selection Tool e clique e arraste o final do identificador para redimensioná-lo:
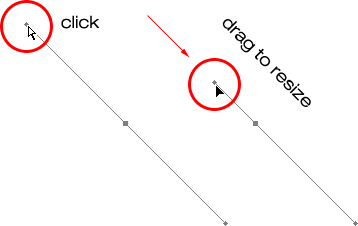
Arraste as extremidades das alças em direção ao ponto de ancoragem para reduzi-las ou arraste-as para longe do ponto de ancoragem para aumentá-las.
Agora vamos ver como girar as alças independentemente uma da outra. To rotate one handle without affecting the other one, first release your mouse button if you've been rotating or resizing the handles so your cursor changes back into the Pen Tool icon. Then, instead of holding down "Ctrl/Command", which moves both handles at once, hold down your Alt (Win) / Option (Mac) key and click on the end of either of the direction handles. You'll see your cursor change into the Convert Point Tool icon, which looks like a simplified arrow made of only two lines, almost like an upside down letter "v" (except that it's not quite upside down). Then, simply drag the handle around the anchor point to rotate it, just as you did before, and this time, the handle will rotate independently of the other one, breaking the connection between them:
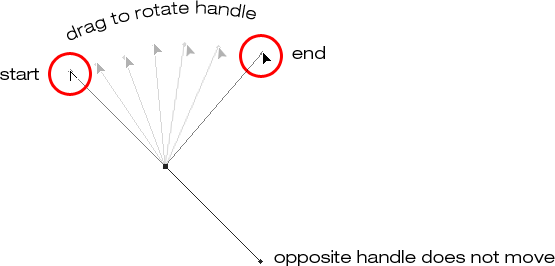
Hold down "Alt" (Win) / "Option" (Mac) and click on the end of either of the direction handles, then drag the handle to rotate it around the anchor point independently of the other handle.
Again, you can release your "Alt/Option" key after you've started dragging. You don't have to hold it down the whole time.
You can also resize direction handles using the "Alt/Option" key in exactly the same way as you can with the "Ctrl/Command" key. If you're in the process of rotating a handle, simply drag it in towards the anchor point to make it shorter or away from the anchor point to make it longer. If you've already released your mouse button and your cursor is showing the Pen Tool icon again, you'll need to hold down "Alt/Option" once again, then click on the end of the handle and drag it to resize it.
Is there a difference between resizing the handles using "Ctrl/Command" and using "Alt/Option" to do it? Sim existe. If you haven't yet "broken the connection" between the handles by dragging one independently of the other, resizing a handle using "Ctrl/Command" will keep the handles connected together. It won't resize both handles at once, but it won't break the connection between them either so you'll still be able to rotate them together if you need to. If you resize a handle using "Alt/Option", you'll break the connection between the handles. Even if you don't rotate the handle as you're resizing it, the connection will still be broken.
What if you've broken the connection between the handles by rotating them using "Alt/Option" and then want to rotate them together again? Can you "rebuild the connection", so-to-speak, by selecting one of them while holding down "Ctrl/Command" as before? Good question, and the answer is no. Once you've broken the connection between the handles, the "Ctrl/Command" key on its own won't bring it back. You'll need to select one of the handles while holding Ctrl+Alt (Win) / Command+Option (Mac) at that point in order to move the handles together again.
Quick Summary So Far …
We've covered a lot of information here about working with direction handles, so before we move on and start drawing some actual curves, let's do a quick recap:
- To add an anchor point, simply click with the Pen Tool.
- To add an anchor point with direction handles extending out from it, click with the Pen Tool, then drag away from the anchor point before releasing your mouse button. The further you drag, the longer the direction handles will be.
- To rotate the direction handles together, hold down Ctrl (Win) / Command (Mac), which will temporarily switch you to the Direct Selection Tool, then click on the end of either handle and drag it around the anchor point. The other handle will rotate in the opposite direction.
- To rotate the direction handles independently, hold down Alt (Win) / Option (Mac), which will temporarily switch you to the Convert Point Tool, then click on the end of either handle and drag it around the anchor point. The other handle will not rotate.
- To resize handles without breaking the connection between them, hold down Ctrl (Win) / Command (Mac) to switch to the Direct Selection Tool, then click on the end of either handle. Drag it towards the anchor point to make it shorter, or drag it away from the anchor point to make it longer.
- To resize handles and break the connection between them, hold down Alt (Win) / Option (Mac) to switch to the Convert Point Tool, then click on the end of either handle. Drag it towards the anchor point to make it shorter, or drag it away from the anchor point to make it longer.
- To rotate the direction handles together after breaking the connection, hold down Ctrl+Alt (Win) / Command+Option (Mac), then click on the end of either handle and drag it around the anchor point. The other handle will once again rotate with it.
Okay, that pretty much covers the basics of how to control the direction handles. Let's see how we can use them to draw some curves!
We've covered a lot of ground so far. We know about anchor points and direction handles. We know that in order to draw straight path segments, all we need to do is lay down a series of anchor points wherever we need them simply by clicking with the Pen Tool, and as we add more and more anchor points, we add more straight sections to our path. We know how to create direction handles and how to rotate them, either together or separately, and how to resize them.
We know how to turn a path into a selection by clicking on the "Load path as selection" icon at the bottom of the Paths palette or by simply pressing "Ctrl+Enter" (Win) / "Command+Return" (Mac) on the keyboard. One thing I didn't mention yet is that regardless of whether our path consists of straight lines,
curves, or a combination of straight lines and curves, converting it into a selection is done exactly the same way, and we've already learned how to do it, which means we're well on our way to mastering making selections with the pen! All we need to do is get a bit of practice drawing curves, which is exactly what we're about to do!
Ainda está rolando? Faça o download deste tutorial em PDF!
Drawing A Curve
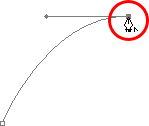
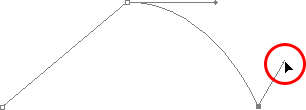
Let's once again start fresh, either by opening up a new blank document in Photoshop or by deleting what you've already done. We're going to draw our first curve so we can put all of our newly-aquired direction handle knowledge to use. First, with the Pen Tool selected and the Paths option selected in the Options Bar, click once somewhere in your document to add an anchor point. Just click, don't click and drag. You should have one single anchor point on the screen when you're done.
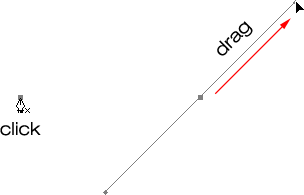
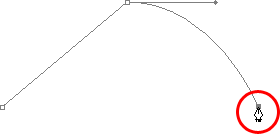
Then, move your mouse cursor up and to the right of your initial anchor point. Click again to add a second anchor point, but this time, drag your mouse a little to the right of the anchor point to drag out direction handles. Hold down Shift as you drag to constrain your movement to a horizontal direction. As you drag out the direction handles, you'll see your path appearing as a curve between the two anchor points! The further you drag your mouse, the longer you make the direction handles, and the more of a curve you create:
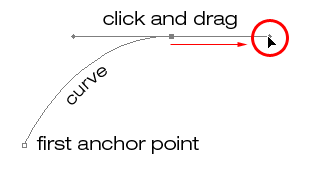
Click once to add an anchor point, then click and drag out a second anchor point with direction handles, creating a curved path segment between the two points.
Click down and to the right of the second anchor point to add a third anchor point. This time, don't click and drag, just click:
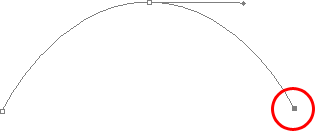
Add a third anchor point down and to the right of the second one by clicking with the Pen Tool.
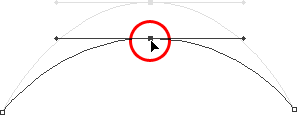
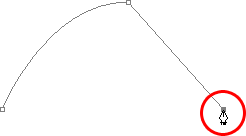
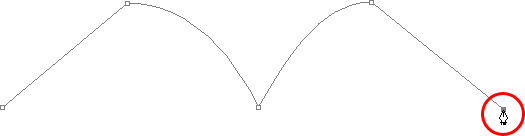
As soon as you add the third anchor point, a second path segment will appear, joining the second anchor point with the third one. And because our second anchor point has direction handles extending from it, this new path segment is also curved! We now have a nice, smooth arc starting from the first point on the left, then passing through the anchor point with the direction handles up top, and coming to an end at the third point.
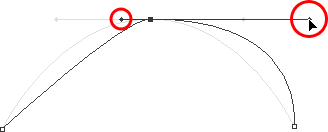
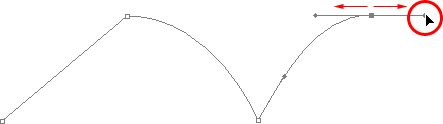
One thing you may have noticed, and you can see it in the screenshot above, is that when you added the third anchor point, the direction handle extending out the left side of the second anchor point disappeared. It's still there, Photoshop simply hid it from view. To see it again, use the keyboard shortcut we've already learned to temporarily switch to the Direct Selection Tool, which is by holding down the Ctrl (Win) / Command (Mac) key, and then click on the second anchor point to select it. As soon as you do, the missing direction handle reappears as if it was there the whole time (which it was):

Hold down the "Ctrl" (Win) / "Command" (Mac) key to temporarily switch to the Direct Selection Tool, then click on the top anchor point to select it. The missing anchor point reappears.
With your "Ctrl/Command" key still held down so you still have access to the Direct Selection Tool, try resizing each direction handle by clicking on the end of each one to select it and then dragging it towards and away from its anchor point. Again, hold "Shift" as you drag to constrain your movement horizontally, and watch what happens. As you increase the length of a handle, you get more of a curve, and as you decrease its length, you get less of a curve. Also notice that each handle controls its own side of the curve. The handle on the left controls the curve coming into the anchor point from the left, and the handle on the right controls the curve flowing out from the anchor point on the right.
Here, I've made my handle on the left shorter, and as we can see, there's much less of a curve now than there was originally, almost becoming a straight line. I've also made the handle on the right longer, and as a result, the curve on the right is now much more pronounced. The faint curve is the original for comparison:
Change the shape of the curves by resizing the direction handles. The left handle controls the left curve, and the right handle controls the right curve.
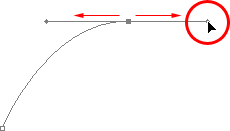
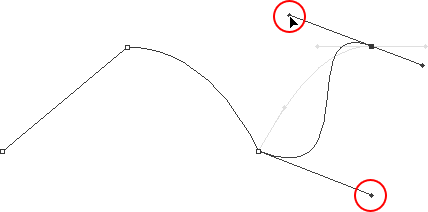
I'm going to undo my changes by pressing Ctrl+Alt+Z (Win) / Command+Option+Z (Mac) a couple of times to set my direction handles back to their original sizes so they're equal length once again. Now let's try rotating the handles. Hold down "Ctrl/Command" once again to access the Direct Selection Tool, then click on the end of either handle to select it and try rotating it around the anchor point. Since we selected the handle with "Ctrl/Command", both handles rotate together. Here I've dragged my left handle down and to the right, and the angle of the curve on the left changed along with it, now appearing as more of a slope as it rises up towards the anchor point. By dragging the left handle down and to the right, I caused the right handle to rotate up and to the left, and again, the angle of the curve on the right changed along with it, now rising above the anchor point briefly before making a steep decent down to the anchor point on the right. Again, the faint curve is the original for comparison:
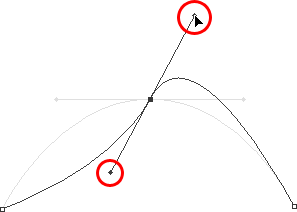
Rotate the direction handles to change the angle of the curves. Select a handle while holding "Ctrl" (Win) / "Command" (Mac) to rotate both handles together.
The Dreaded "Loop"
One thing you want to avoid is rotating the handles too far, which will cause your path segments to overlap and create loops. Here, I've rotated my handles all the way around so that the left handle is now on the right and the right handle is on the left, and notice what's happened. My path segments are now overlapping each other, creating a loop:
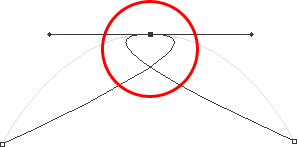
Rotating the direction handles too far causes the path segments to overlap, creating an unwanted loop in the path.
Loops can be caused by rotating the direction handles too far, as I've done above, but more often than not, they're caused by a handle being too long, making the curve too long and causing it to overlap with itself. If that happens, which it does sometimes as you're drawing a path, simply shorten the length of the direction handle. Most people end up creating a whole bunch of loops in their path when they first start working with the Pen Tool, so don't think you're the only one. No need to panic or become frustrated though. As I said, the problem is most likely being caused by a direction handle being too long, and all you need to do is shorten the handle to "un loop" the loop!
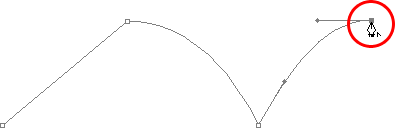
I'm going to press Ctrl+Alt+Z (Win) / Command+Option+Z (Mac) a few times once again to undo my changes and reset my path back to the nice smooth arc I started with. Now, what about rotating the direction handles independently of each other? As we learned on the previous page, to rotate the handles separately, instead of selecting them with "Ctrl/Command", we simply select them while holding down Alt (Win) / Option (Mac), which gives us temporary access to the Convert Point Tool. Click on the end of a handle to select it, then drag it with your mouse to rotate it and this time, the other handle will stay in place, breaking the connection between them.
Here, I've selected the handle on the right while holding "Alt/Option" and then rotated it down and to the left. Notice how once again, the angle of the path segment on the right changes to match the new direction of the handle, and this time, the handle on the left, along with the path segment on the left, both stay in place. My path now looks a bit like a shark fin:
Hold down "Alt" (Win) / "Option" (Mac) to temporarily access the "Convert Point Tool", then click on the end of a direction handle to select it and rotate it independently of the other handle.
Moving An Anchor Point
One thing we haven't looked at yet is how to move an anchor point. If you recall, I mentioned on the previous page that the Pen Tool is extremely forgiving, and one of the reasons for it, besides being able to rotate and resize our direction handles after we've created them, is that we can easily move anchor points from one spot to another if we need to. As we've already learned, anchor points anchor a path into place. The anchor points themselves, however, are not anchored into place. You can move an anchor point anywhere, anytime, and any path segments that are connected to it will move and adjust right along with it.
To move an anchor point, hold down Ctrl (Win) / Command (Mac) to temporarily access the Direct Selection Tool as we've already been doing, then simply click on the anchor point to select it and drag it to its new location with your mouse. Any path segments connected to it will move with it to the new location. Here, I've dragged my middle anchor point down a bit from its original location (again, the faint path marks the original location for comparison). Notice how the path itself has changed shape to adjust to the new location of the anchor point:
Hold down "Ctrl" (Win) / "Command" (Mac) and click on an anchor point to select it, then drag it to a new location. Any path segments connected to the point will move with it, changing shape as needed.
Normally, when outlining an object with a path to select it using the Pen Tool, you won't need to move to an anchor point quite as far as what I've done above, but it's very common to go back around your path after you've created it and nudge a few anchor points here and there to fine-tune the path. Once you've selected an anchor point, you can nudge it up, down, left or right using the arrow keys on your keyboard.
Combining Straight Paths With Curves
What if I didn't want both of my path segments to be curves? What if what I needed was for the first path segment to be curved, but the second one needed to be straight? Vamos ver como fazer isso. I'm going to delete my existing path and start over again. First, I'll click to add an anchor point to start things off. Then, just as before, I'll click to add a second anchor point up and to the right of my initial point, and this time, I'll drag out direction handles, which will create a curved path connecting the two points, giving me exactly what I had way up at the start of this page:
Click once to add an anchor point, then click to add a second anchor point and drag out direction handles to create a curve.
I now have my initial curve, but I want my next path segment to be straight. If I was to simply click somewhere to add another anchor point right now, I would get another curve because I have that direction handle extending out from the right side of the last anchor point I added. What I need to do is get rid of that one direction handle. Without a direction handle controlling the angle and length of a curve, we get a straight line.
To remove the handle, leaving only the handle on the left of the anchor point, all I need to do is hold down Alt (Win) / Option (Mac), which will again temporarily switch me to the Convert Point Tool, and then I just click directly on the anchor point. When I do, the direction handle on the right disappears, leaving only the one on the left:
Hold down "Alt" (Win) / "Option" (Mac) and click directly on the anchor point to remove the direction handle on the right, leaving only the one on the left.
Now, with the direction handle gone, if I click to add a new anchor point, I get a straight path segment between the two points :
With the direction handle on the right now gone, clicking to add a new anchor point adds a straight path segment between the two points.
I now have a curved path segment on the left and a straight one on the right! What if I wanted the exact opposite? Suppose I needed to start with a straight path segment and then follow it with a curve? To do that, first I'll start by clicking to add an initial anchor point. Then, since I want a straight path segment, all I need to do is click somewhere else to add a second anchor point, and I automatically get a straight path connecting the two points:
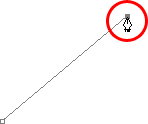
Click with the Pen Tool to add an initial anchor point, then click again somewhere else to add a second anchor point and create a straight path segment between them.
I'm going to keep my mouse button held down after clicking to add my second anchor point because I want my next path segment to be curved, and we know that in order to create a curve, we need a direction handle. To add a handle extending out from the right of my anchor point, I'm going to hold down Alt (Win) / Option (Mac), and with my mouse button still down, I'm simply going to to drag to the right of the anchor point. As I do, a direction handle will drag out along with it:
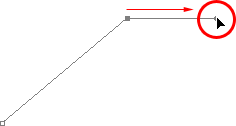
Hold down "Alt" (Win) / "Option" (Mac) and drag out a direction handle on the right of the anchor point.
Notice that the direction handle extended only from the right of the anchor point, not from both sides, leaving my straight path segment on the left in place. And now that I have my direction handle on the right, all I need to do to create my curve is click to add a third point:
Click to add a third anchor point, which creates a curved path segment between the previous anchor point and the new one.
And there we go! I now have a straight path segment on the left, followed by a curved segment on the right. Of course, most paths you draw are going to consist of more than just three anchor points. Let's say I wanted to continue this path, moving in the same general direction towards the right, and I want my next path segment to be curved as well. Just as I did a moment ago, I would leave my mouse button held down after clicking to add my third point. I would hold down Alt (Win) / Option (Mac) and I would drag out another direction handle. So far, we've only been dragging handles out towards the right, but what you really want to do is drag your handles out in the general direction you want the curve to follow. I want to create a curve that goes up and to the right, so I'm going to drag out a small handle in that same general direction:
Drag out your direction handles in the general direction of the curve.
Gorjeta! A good practice to get into is to keep your direction handles small when first dragging them out, since you never really know how long or at what exact angle they need to be until the actual curve appears, and the curve doesn't appear until you've added both of its anchor points. Once you've added both points and the curve appears, you can easily go back and make any adjustments you need to the handles. You may even want to wait until you've drawn the entire path before worrying about adjusting the handles.
With my direction handle created, I'm going to click to add a fourth anchor point, and I'm going to drag out direction handles from it as well:
Adding a fourth anchor point along with direction handles extending from it.
I now have a third segment added to my path, this one being a curve. Notice that this curve actually has two direction handles controlling it, one extending from the right of my third anchor point and one extending from the left of my fourth point:

The third path segment now has two direction handles, one on either end, working together to control the curve.
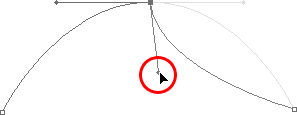
The overall shape of this curve is now being controlled by the length and direction of both of these handles. Watch what happens to the curve when I move the handles. I'll drag the bottom handle down and to the right, and I'll drag the top handle up and to the left. I'll also drag both of these handles longer. The faint curve is the original for comparison:
Changing the direction and/or length of either handle changes the overall shape of the curve. After rotating and lengthening both handles, the curve now appears in an "S" shape.
The curve is now a bit "S" shaped, and that's because the bottom handle is controlling the angle and length of the curve as it flows out from the third anchor point, while the top handle is controlling the angle and length of the curve as it flows into the fourth point. Changing the length and/or direction of either handle will change the overall shape of the curve.
I'm going to press Ctrl+Alt+Z (Win) / Command+Option+Z (Mac) a couple of times to undo the changes I made, so the curve is once again in a simple arc shape as it was a moment ago, and I think I'll finish off this path with another straight segment, which means I'll need to remove that direction handle extending out from the right side of the fourth anchor point. We've already learned how to do that, by holding down Alt (Win) / Option (Mac) and clicking directly on the anchor point itself:
Hold down "Alt" (Win) / "Option" (Mac) and click directly on the anchor point to remove the direction handle on the right.
With the direction handle gone, all I need to do now to add a straight path segment is click to add another anchor point:
The direction handle on the right is now gone, so we can add a straight path segment simply by clicking to add another anchor point.
We could continue this path for as long as we wanted, adding more straight segments and curves, but I think we'll stop here because we've pretty much covered everything we need to know about drawing paths with the Pen Tool at this point. That was a lot of information to take in, especially if this is your first time learning about paths. As I mentioned at the beginning, you won't become a Pen Master simply by reading through this tutorial, just as you won't learn how to ride a bike, or drive a car, learn to swim, or play the piano simply by reading about it. But hopefully you have some sense at this point of how to draw paths with the Pen Tool, how to draw straight path segments, how to draw curves by dragging out direction handles, how to change the length and angle of the curve by rotating and resizing the handles, and how to combine straight and curved segments in a path.
To finish off our look at making selections with the Pen Tool, let's see a practical example of how to select an object with curves.
Here, we have a photo of a couple of dolphins leaping out of the water. Definitely a couple of very curvy creatures:

A photo of two dolphins jumping out of the water.
Let's say we want to select these dolphins so we can use them for a design or a collage, or whatever the case may be. If you were to try selecting them with the Lasso Tool, which is most likely what you would end up using if you didn't know how to use the Pen Tool, not only would you have a tough time, you'd have an even tougher time trying to convince yourself that you were happy with the results when you were done. The reason is because the Lasso Tool simply isn't capable of making curved selections very well. The biggest problem with it, besides being a pixel-based selection tool, is that it relies on you having a steady enough hand to move it smoothly around the curves. Even if you don't suffer from a caffeine addiction, you could drive yourself crazy trying to draw a perfectly smooth curve with your mouse, or even with a pen tablet, and when you've finally given up, you'll still be left with a selection full of rough, jagged edges that just scream "amateur!". No one likes to be called an amateur, especially when there's no need for it thanks to the Pen Tool!
Examine The Object First
Whenever you're about to select something with the Pen Tool, before you begin, take a moment to examine the object carefully to get a sense of where you're going to need to place your anchor points. Forget about all the details in the object and focus only on its shape. Where are the areas where the shape changes direction? Which parts of the shape are straight? Which parts are curved? If there's a curve, is it a smooth, continuous arc or does the angle change at a spot along the curve? Visualize in your mind where you're going to need to place your anchor points, because when you place one, you always want to be thinking about the next one and what the path segment between the two points needs to look like.
A Tool Of Elegance
One more thing to keep in mind is that the Pen Tool is meant to be a tool of elegance . It's not a nail gun or a staple gun. You don't want to just go clicking around your shape adding anchor points all "willy nilly" (that's a technical term). When using it to draw curves, you want those curves to be nice and smooth, otherwise we might as well just stick with the Lasso Tool. To keep the curves flowing smoothly, we need to limit the number of anchor points we use to create them. That's why you want to take a moment to examine the object first and visualize where the anchor points need to be. If you can outline a large section of the shape using only one curve with an anchor point on either end, that's what you want to do, because that's what's going to give you the kind of results you're looking for. The kind of results that scream "definitely not an amateur!".
Let's select these dolphins. I'm going to start my path in the middle of the photo, at the spot where the side of the dolphin on the left overlaps the rear flipper of the dolphin on the right. There's no right or wrong place to begin a path. This is just where I've decided to start. The first part of that rear flipper is straight, so since I don't need a direction handle to create a straight path segment, I'm simply going to click once with my Pen Tool to add my first anchor point, which will serve as the starting point for my path:
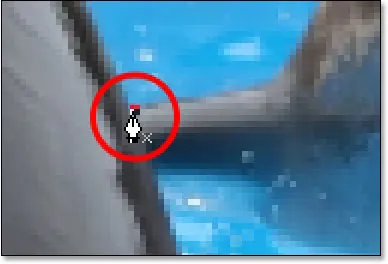
Adding the first anchor point.
As I mentioned earlier, you'll probably find it helpful to zoom in on your image as you're drawing your path. To scroll the image around on the screen as you're zoomed in, hold down the spacebar, which will switch you temporarily to the Hand Tool and allow you to move the image around on the screen by clicking and dragging it.
The top of that flipper actually has a slight curve to it as it approaches the dolphin's tail section, so for my second anchor point, I'm going to click at the point where the flipper and tail section meet, and I'm going to drag out short direction handles, dragging up and to the right in the direction that the tail section is moving. Notice that I've now created a slight curve along the flipper:
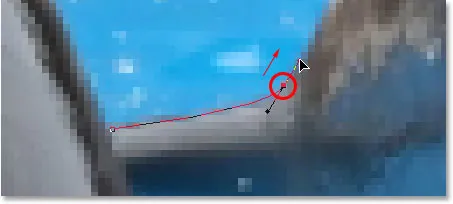
Adding the second anchor point and dragging out small direction handles to add a slight curve to the first path segment.
As I continue up along the tail, I can see that it stays straight for a short distance, followed by a curve to the right, so I'm going to click to add a third anchor point at the spot where the curve begins. This gives me a straight path segment between the previous point and the new one. I know there's a short direction handle extending out from the previous anchor point, which normally means that my new path segment will be a curve, not a straight section, but because the handle is so short and is also moving in the same direction as the path segment, there is no noticeable curve to it. Consider it a "mostly straight" path segment:
Clicking to add the third anchor point, creating a (mostly) straight path segment.
Continuing along, we come to the first real curve in our path. For this, I'm going to need to drag out a direction handle from the anchor point I just added, so I'm going to hold down Alt (Win) / Option (Mac), then drag out a handle in the general direction where I want the curve to flow as it starts. Notice how I'm only dragging out a handle from the one side of the anchor point, not both:
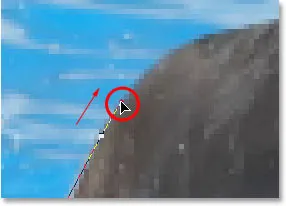
Hold "Alt" (Win) / "Option" (Mac) to drag out a direction handle from one side of an anchor point.
To add the curve, I'll click and drag at the spot where the curve ends, shaping the curve as I drag out the handles until it matches the curve of the dolphin's tail. If I needed to, I could also go back and change the length and direction of the handle at the start of the curve to fine-tune it, but in this case, I don't need to do that:
Adding an anchor point at the opposite end of the curve and dragging out direction handles from it, rotating and resizing them as needed until the curve matches the curve of the object.
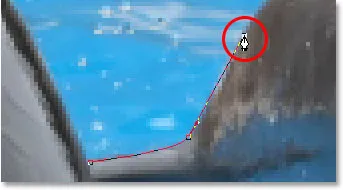
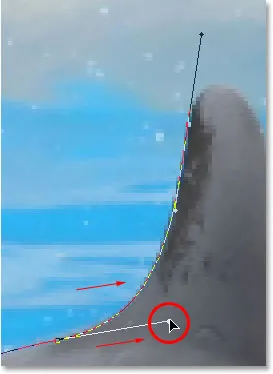
The next area of the dolphin is pretty straight, right up until its back begins to merge with its dorsal fin, at which point there's another curve, so I'm going to click to add an anchor point just before the curve up the dorsal fin begins, which is going to give me another "mostly straight" path segment between the previous point and the new point. Then I'm going to once again hold down Alt (Win) / Option (Mac) and drag out a direction handle as I prepare for my next path segment which will be curved:
Click to add an anchor point, then hold down "Alt" (Win) / "Option" (Mac) and drag out a direction handle to prepare for the next path segment.
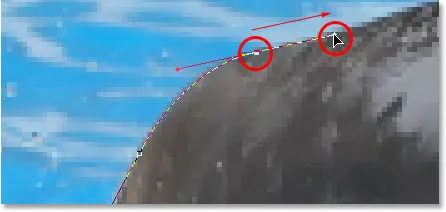
The left side of the dorsal fin consists mainly of one continuous curve upward until it gets near the very top, at which point the shape changes, so to create this curve, I'm going to click and drag at the point near the top where the curve will change direction. As we can see in the screenshot, this adds a curved path segment between the previous anchor point and the new one, but the curve is not yet following along the shape of the fin. It's going to need some fine-tuning:
Adding a curve along the left side of the dorsal fin. The curve still needs some adjusting.
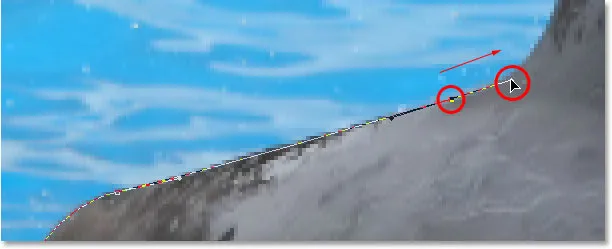
To adjust the curve, I'm simply going to hold down the Ctrl (Win) / Command (Mac) key, which gives me temporary access to the Direct Selection Tool, and I'm going to drag the handle extending out from the bottom anchor point towards the right to lengthen it, which is going to pull the angle of the curve in towards the right along with it, lining it up nicely with the curve of the fin. I've also rotated the top direction handles slightly in a clockwise direction just to be nit-picky, but the majority of the adjustment was done using the bottom direction handle:
Adjust the curve by adjusting its direction handles.
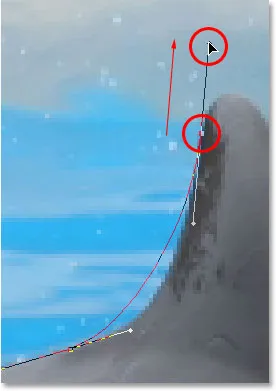
To add a curve around the top of the fin, I'll click and drag on the opposite side of it to add another anchor point with short direction handles. Notice though that we run into a bit of a problem. The direction handle on the left side of the curve is too long and it's pulling the curve away from the top of the fin:
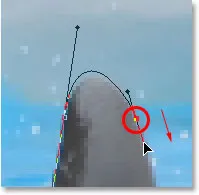
The direction handle on the left of the curve is too long, resulting in the curve not following the shape of the fin.
To fix that, all I need to do is once again hold down Ctrl (Win) / Command (Mac), then click on the end of the handle to select it and drag it shorter until the curve is the proper shape:
Shortening the length of the direction handle to adjust the shape of the curve.
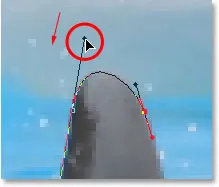
Let's finish creating our path around the dorsal fin. The remainder of the fin is basically a straight line, so I'm going to click at the base of the fin to add another anchor point which adds the straight path segment, completing our path around the fin:
Adding an anchor point at the base of the fin to finish drawing the path around it.
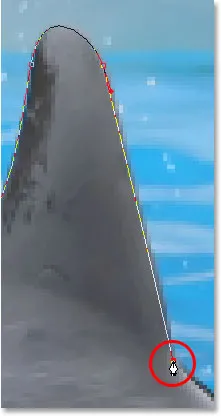
Since you and I would both be here all day if I was to continue commenting on every anchor point, direction handle and path segment as we make our way slowly around the dolphins, and since we've covered everything we need to know at this point, I'm going to go ahead and draw the rest of the path, outlining both dolphins:
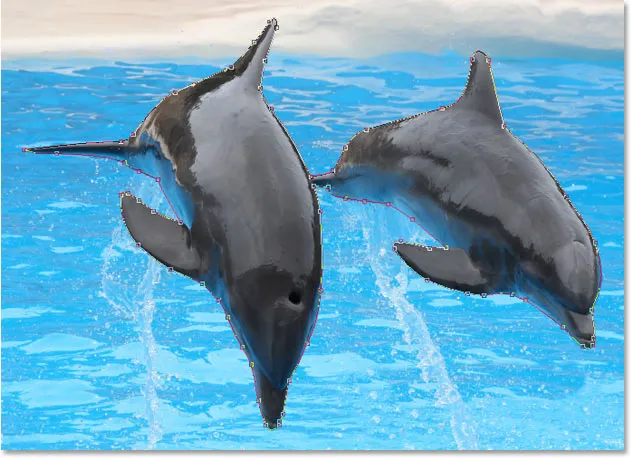
Both dolphins are now outlined by the path.
The dolphins have now been outlined with the path, and if we look at the Paths palette, we can see that sure enough, we have a path in the shape of the dolphins:
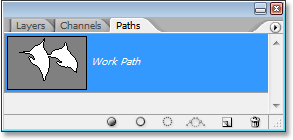
Photoshop's Paths palette showing the outline of the dolphins in the preview thumbnail.
As we've learned, Photoshop automatically names the path "Work Path", which means it's temporary and will be replaced if we start a new path. If you wanted to save it, you would need to double-click on the name "Work Path" and rename it to something else, like "Dolphins" in this case. I'm not going to worry about that, since I have no need to save it. All I want to do at this point is convert my path into a selection, and since I'm already in the Paths palette, I'll do that by clicking on the Load path as selection icon at the bottom of the palette:
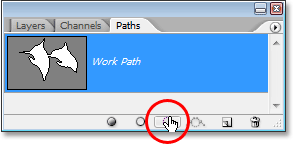
Clicking the "Load path as selection" icon at the bottom of the Paths palette.
I could also have used the keyboard shortcut Ctrl+Enter (Win) / Command+Return (Mac) . Either way converts my path into a selection, and if I look at my photo, I can see that my path has indeed become a selection around the dolphins:

The path around the dolphins has now been converted into a selection.
Para onde ir a seguir …
E aí temos que! The dolphins are now selected and ready for whatever plans we have for them. And with that, we wrap up our look at drawing paths and making selections with the Pen Tool in Photoshop! Para obter mais informações sobre as ferramentas de seleção do Photoshop, consulte o tópico Como fazer seleções na série Photoshop. Visite nossa seção Noções básicas do Photoshop para obter mais tópicos sobre o Photoshop!